
Slippage is the gap between the price you expect and the price your trade fills at, and it decides whether your order goes through or fails. On a new token launch, start low and raise it only after a buy fails.
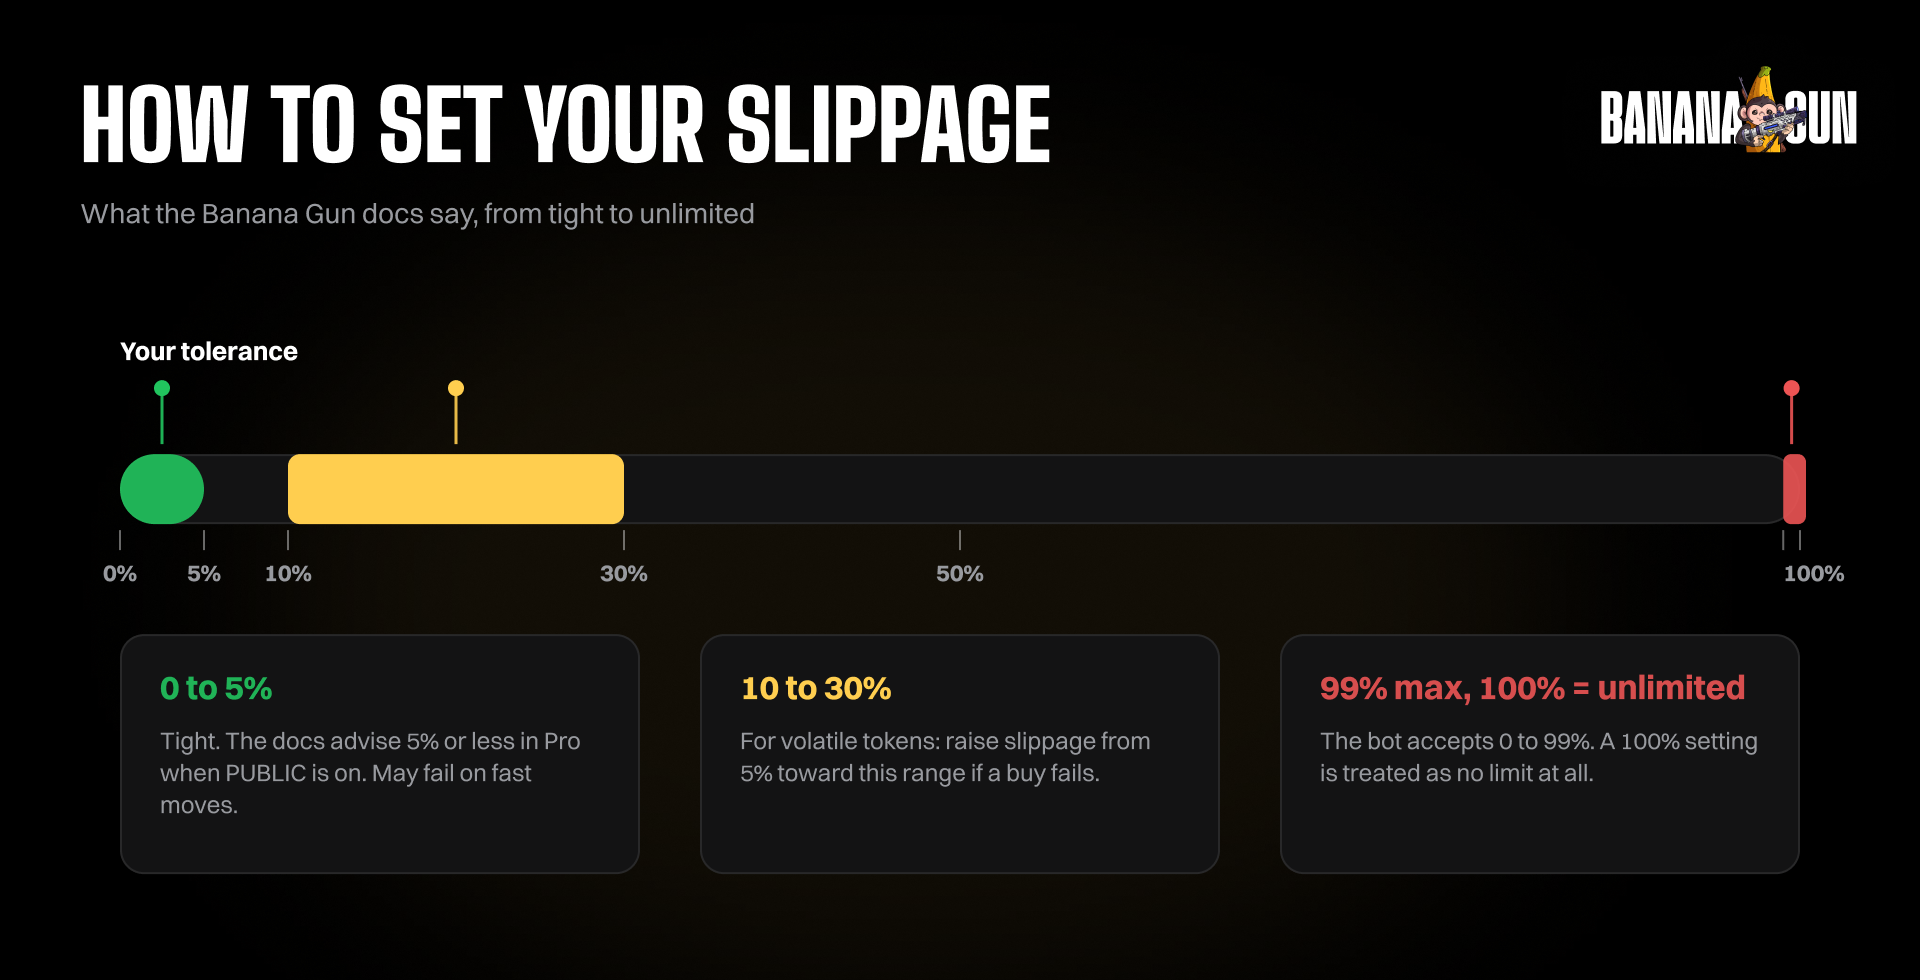
The Banana Gun docs suggest raising slippage "from 5% to 10-30%" for volatile tokens. You set it in the buy menu of the Telegram bot or in the BUY widget of Banana Gun Pro, and the steps are below.
What is slippage in crypto?
The docs define it as "the difference between the expected price of a trade and the price at which it actually executes." A higher percentage raises the chance of execution but may give a worse price. A lower one can make the trade fail.
Think of the percentage as a ceiling. It is the most price movement you accept between tapping buy and the transaction landing.
Slippage tolerance vs price impact
These two get mixed up. Price impact is how far your own order pushes the price, and it grows when the pool is thin and your order is large.
Slippage tolerance is the limit you set for the total difference. The price can move because of your order, because other buyers got in first, or because someone sandwiched you.
In the docs, the Price Impact Limit is "the maximum percentage the token price can change because of your order." That is a separate setting from Slippage.
Why slippage is worse on a new token launch
A fresh pool has very little liquidity. A small buy can move the price a lot, and a crowd of buyers landing in the same block moves it again before your transaction confirms.
That is also why launches attract sandwich bots. A bot buys just before you and sells just after you, and the looser your tolerance, the more room it has. The post on how sandwich attacks drain crypto traders walks through it.
What the docs say about slippage
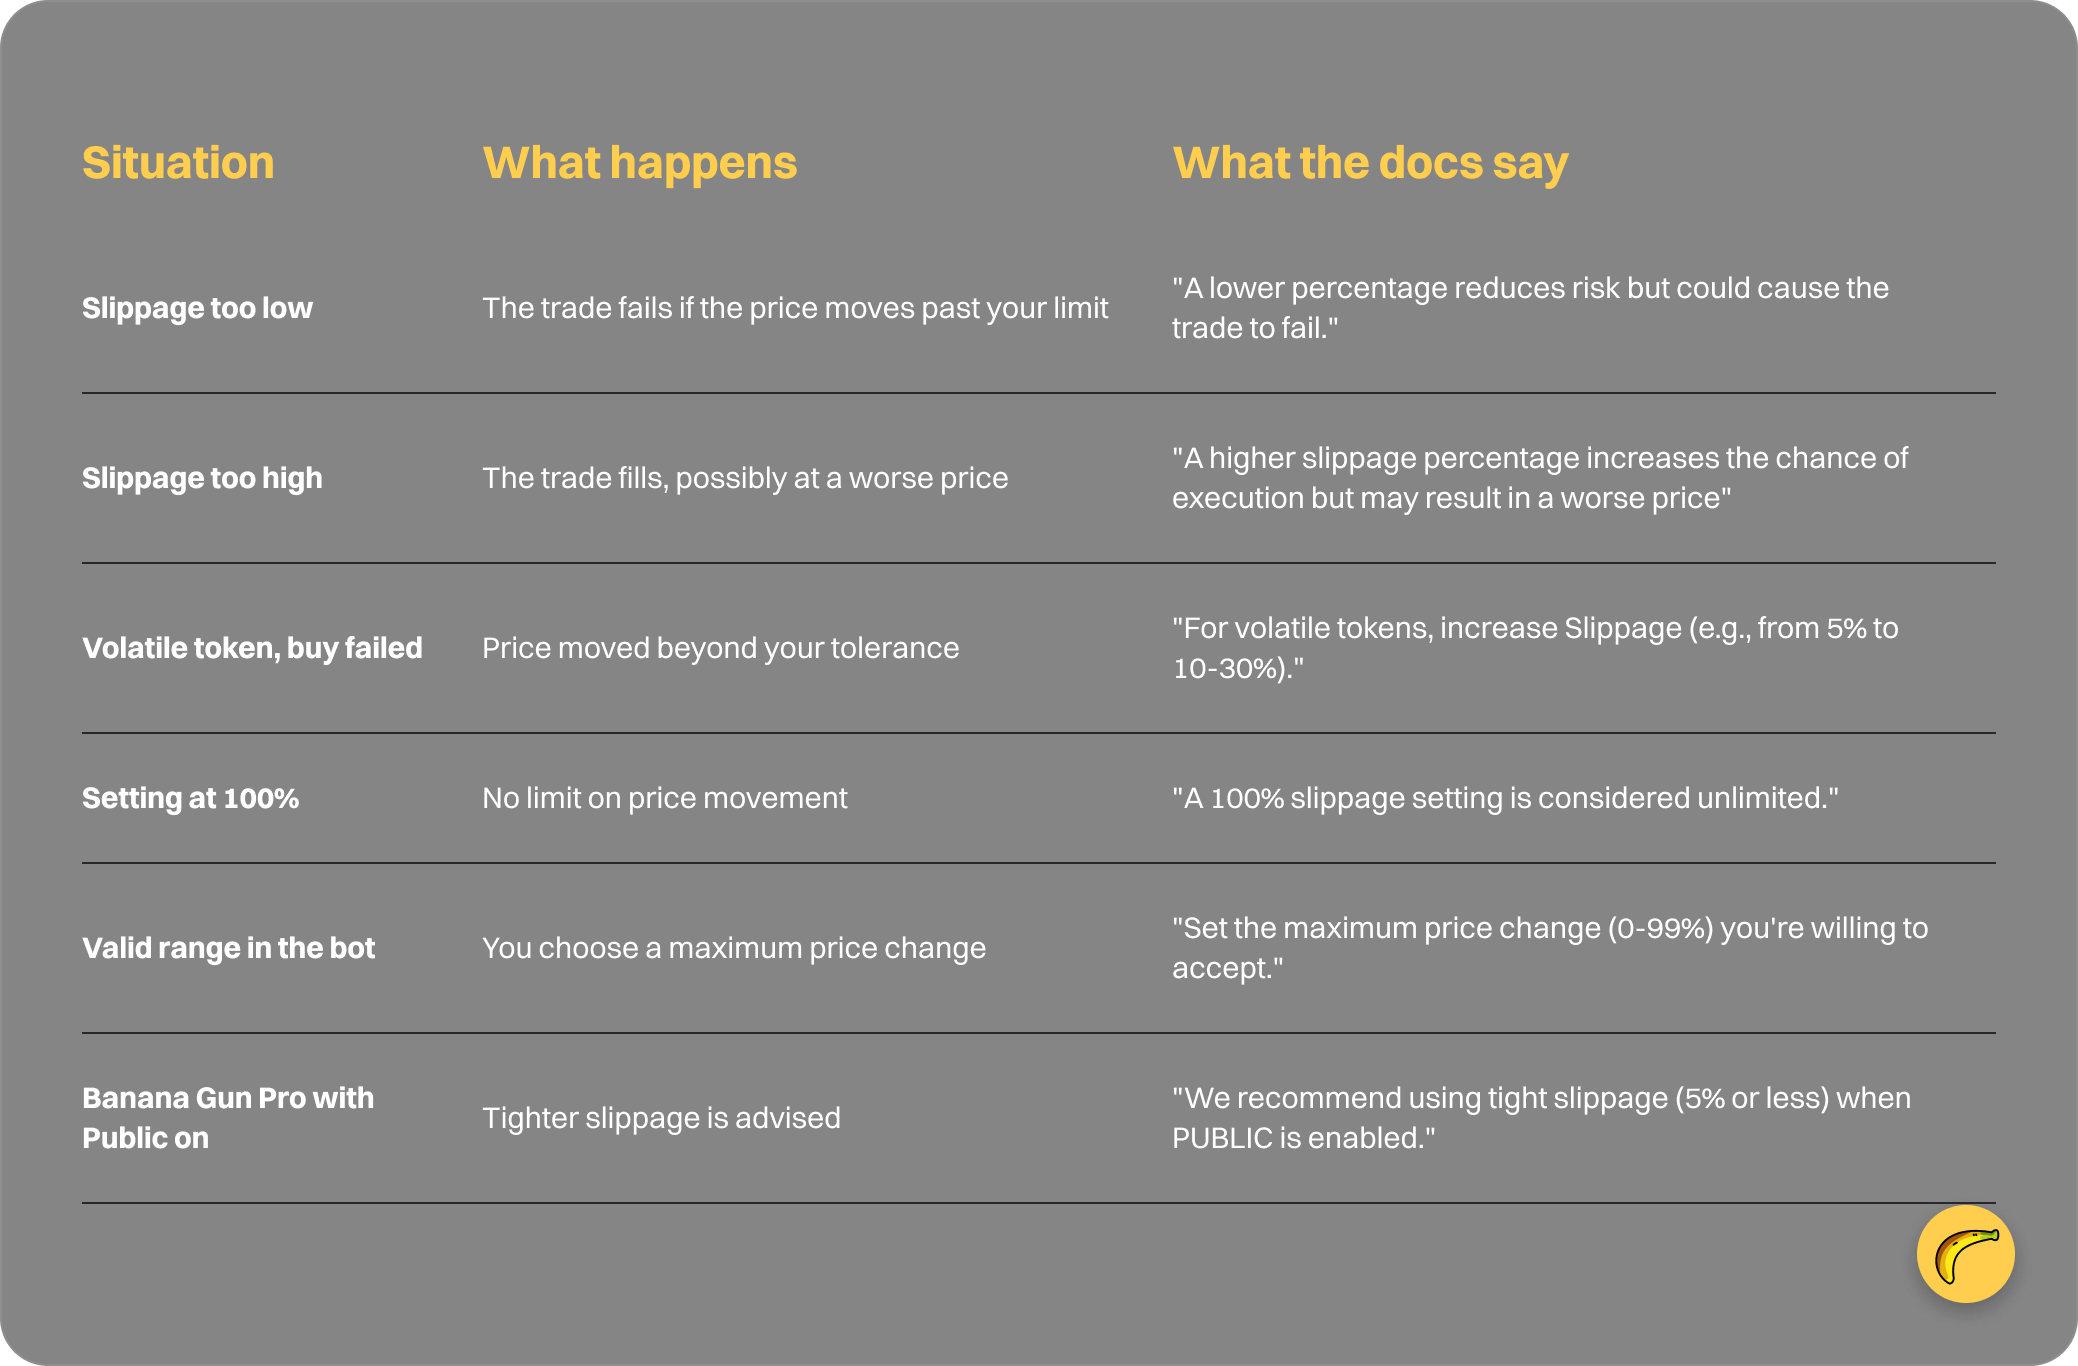
The docs also say to consider "your trade size, market volatility, and liquidity depth when setting slippage."
What slippage should you use on a new token launch?
Start low and raise it in steps. The docs give no single launch number and no default percentage, so any figure sold as "the right one" is a guess.
Begin at whatever your preset already holds. If the buy fails, raise slippage and try again. The docs' own example for volatile tokens is a move from 5% to 10-30%.
Do not jump to 100% to be safe. The docs call that unlimited, which means you accept any price. For what each percentage costs on the way in and out, use the meme coin profit calculator.
Step 1: Set slippage in the Telegram buy menu
1. Open the buy menu. Paste a contract address or a supported URL into the bot chat, and the Buy panel opens.
2. Tap Slippage. Select the "Slippage" button in the buy menu. The sell menu has its own Slippage button, so you can set each side separately.
3. Type a percentage. Enter your desired slippage percentage, for example 10. The docs show the change as "Slippage changed from 15% to 10%".
Step 2: Understand presets and Set All
1. Know that edits change your preset. Changes made in a Buy panel update the selected preset, such as Normal.
2. Pick the preset you want. Banana Gun includes three default presets: Normal, Fast and Insane. Each has its own gas, slippage, Anti-MEV, MEV tip and price impact settings.
3. Use Set All for one value. Select Set All to apply a setting change to all presets. Each chain has its own preset configuration.
Step 3: Raise slippage after a failed buy
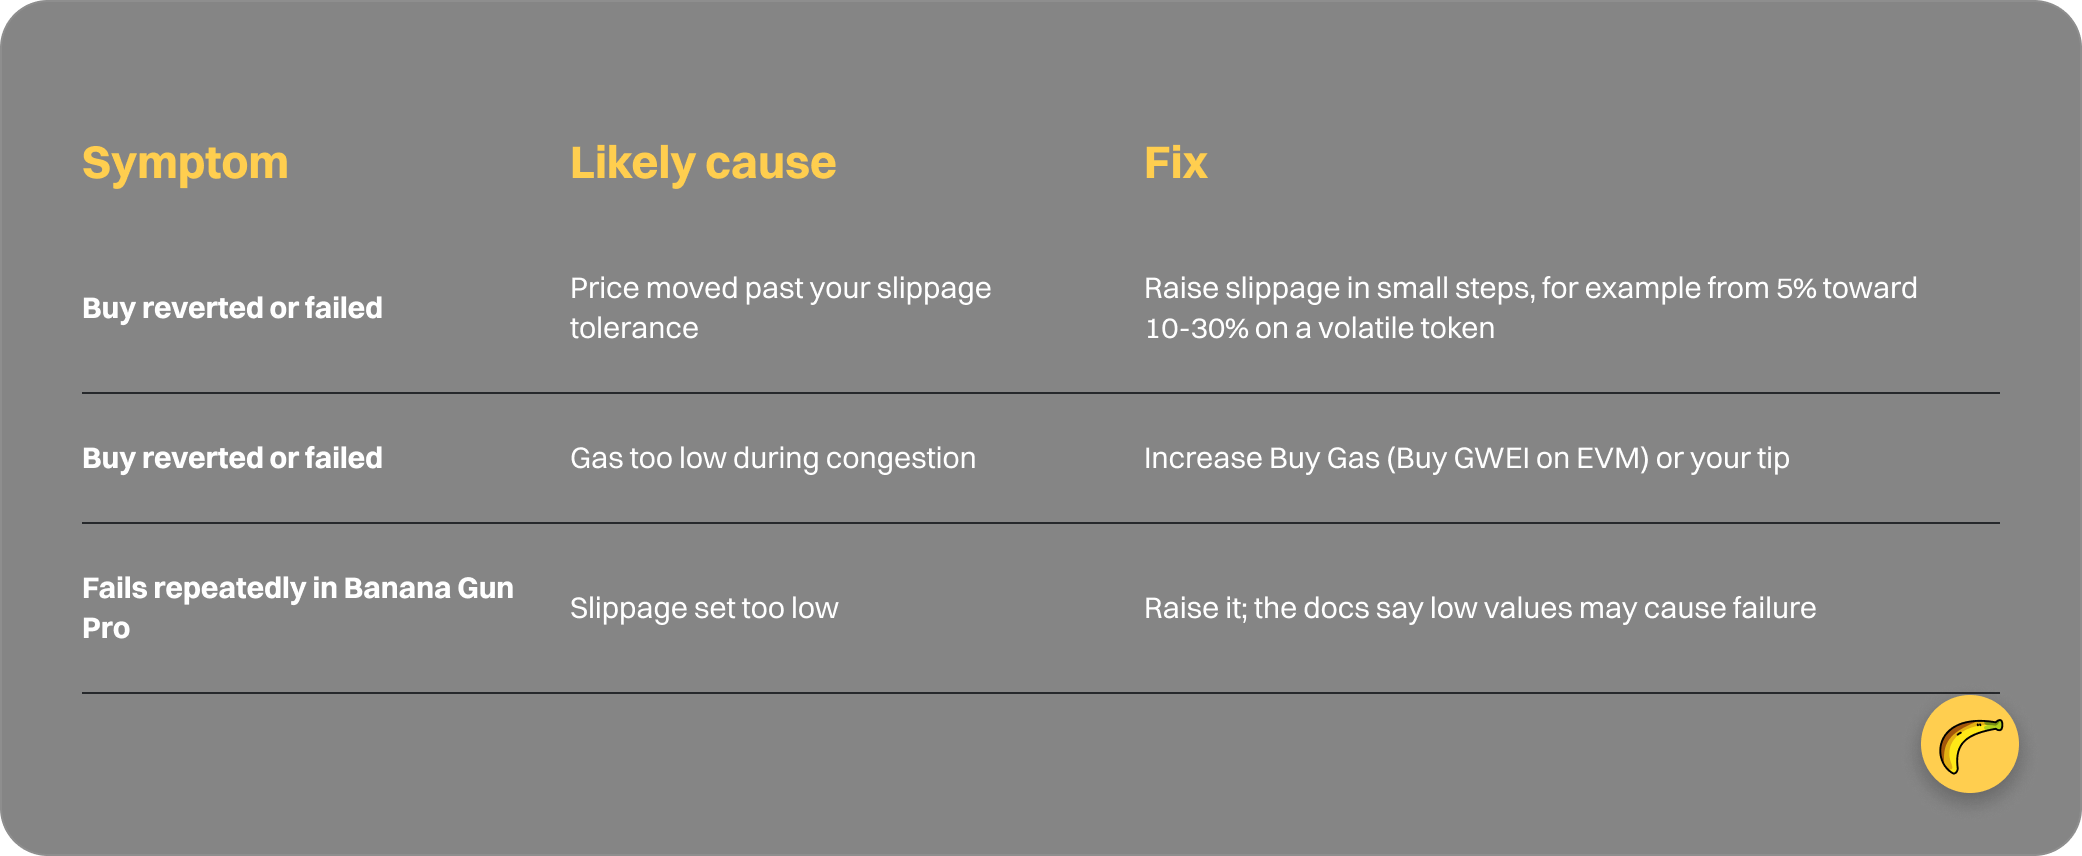
1. Read the failure first. The docs list it under "Buy/Sell Reverted or Failed Transaction?" and say failures usually come from low gas during congestion or from "token price changes that exceed your slippage tolerance."
2. Raise slippage one step. For volatile tokens the docs suggest moving from 5% to 10-30%. Change it with the Slippage button and retry.
3. Check gas and tip too. The same page says to increase Buy Gas or Sell Gas, and your tip. On EVM chains the field is Buy GWEI, and a failure is not always a slippage problem.
Step 4: Set slippage in Banana Gun Pro
1. Open the BUY widget. In Banana Gun Pro at https://pro.bananagun.io, find the BUY widget. Settings apply independently to the BUY and SELL widgets, so check both.
2. Click the arrow. The downward arrow next to MEV TIP is where buy and sell order settings live. You will see Slippage there, along with MEV Protection, Public, Price Impact and Bundle Fees.
3. Enter the slippage and confirm. The docs say setting it too low "may cause transactions to fail." Enter the value, then click CONFIRM BUY.
4. Match slippage to the send mode. MEV Protection sends only to Jito. Public is the fastest route, and the docs say to use tighter slippage with it, 5% or less.
Why did my buy fail? Causes and fixes
If you are new to the bot, the first trade walkthrough covers the rest of the flow. For sandwich protection beyond slippage, see how MEV protection works in a trading bot.
FAQ
What is a good slippage for a new token?
There is no fixed number in the docs. Start at the lowest value that fills and raise it only after a failed buy. The docs' example for volatile tokens is 5% to 10-30%.
Does higher slippage make a buy more likely to go through?
Yes. A higher percentage increases the chance of execution, but it may give you a worse price. A lower one reduces risk but can cause the trade to fail.
Can I set different slippage for buying and selling?
Yes. Buy and sell menus each have their own Slippage button. In copy trading, use Buy Slippage and Sell Slippage in the Advanced Settings section.
What does 100% slippage mean?
The docs call 100% unlimited, so you accept whatever price the trade finds. On a thin new pool that removes your price protection entirely.
Does slippage stop sandwich attacks?
No. A tighter limit leaves a sandwich bot less room, but it does not hide your trade. In Banana Gun Pro the docs say to use tighter slippage when Public is on, and the Telegram bot handles sandwich protection with a separate Anti-MEV setting.
Set it in Banana Gun
Open the bot at https://t.me/BananaGun_bot, paste a contract address and tap Slippage in the buy menu. Prefer the browser? Banana Gun Pro is at https://pro.bananagun.io.